


Leica Sequential Scans
A frequent problem with imaging a sample stained with multiple fluors is bleedthrough or crosstalk, where the photons generated from one fluor can also be collected in the detector assigned to another fluor. This happens when dyes have an overlap in their emission spectra, as shown in this example.

Dyes like Hoechst and DAPI are notorious for having very stretched out emission spectra, which extend well into the green regions of the visible spectrum (shaded region). If you are simultaneously scanning DAPI and Alexa488 with the UV and Argon lasers, for example, it is likely that photons emitted from the DAPI will “contaminate” the photons collected in the Alexa488 window.
One way to avoid this issue is to set up a sequential scan, where each laser scans your sample one at a time. On the Leica SP8, you must program in the instructions. Start by clicking the Seq button in the Acquisition panel.

This will open the sequential scan panel.

You will have a choice of several scan modes. The “between lines” mode instructs the first laser to scan a line, then the second laser scans the same line, etc., then the scanner moves to the next line and the process repeats. Between lines is recommended for live imaging situations where your sample could move, or any time-dependent measurements. You will be very restricted in the setting adjustments you can make.

With “between frames”, the first laser will scan the whole designated X-Y region, and then the 2nd laser scans the same region, until all the lasers have scanned. If you have set up a Z-stack the whole process will repeat for the next slice(s). This mode is suitable for fixed samples.

The “between stacks” mode will scan ALL the specified optical sections with the first laser, then repeat for the next, etc. This mode is recommended for samples with dyes that are sensitive to photobleaching.

To set up Seq1, you need to shut down/ turn off all lasers and detection windows that will not be used for the first sequence. For example, a window with settings for 3 different fluors that would look like this in a simultaneous scan:

For defining Seq1, you would adjust the slider bars for the 488 and 520 laser lines to 0, and turn off detection windows 2 and 3. You can set up 2 lasers to scan simultaneously within a sequence setting, provided that the fluor emission spectra have little to no overlap (for example DAPI and a fluor that emits in the red region of the spectrum). You can also activate the bright field window to be active simultaneously with a fluorescent window.

Live scan your sample with the first laser, and make the adjustments to find the right level of exposure. If you are imaging a Z-stack, find and set your begin/end points. When you are finished, stop the scan and click the “+” button to generate a “Seq2” button:

Note that the Seq2 button is red, while Seq1 has gone grey. The red indicates which sequence is “live” and will be affected by any setting adjustments. Clicking on a grey Seq button turns it live (and the former live one off). You can reuse the same detection window in setting up Seq2, or use a different one. If you choose to reuse the same window, PMT3 is usually the best choice. Make the adjustments for Seq2.

Do the same for Seq3 and so on.

Once you have arranged the sequential scan settings to your liking, you can save them for future use. Click the “Save” button and save the settings (as a .seq file) to a settings folder on the Leica computer. You can use the “Load” button to retrieve your saved settings for future imaging.
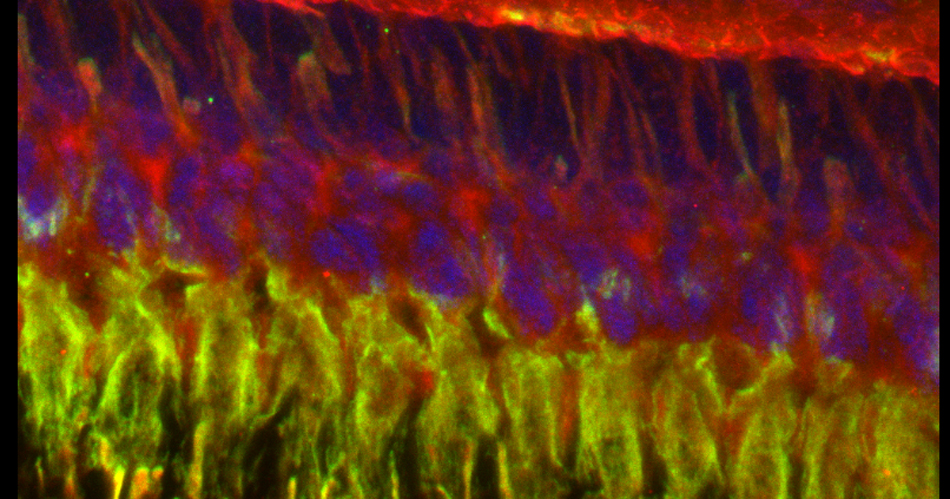
As a demonstration of the difference that sequential scanning can make- here is an example of simultaneous scanning on a sample with fluors that overlap:

In this case there is bleedthrough from channel 2 (red) into channel 3 (cyan).
The same sample scanned with a between frames sequential scan:

Here the interference from the red channel has been eliminated, allowing the real pattern of the cyan channel to be seen.
Sequential scanning can solve many bleedthrough issues, but it is not the universal cure-all. For example, if you have 2 fluors that can be excited equally by the same laser (excitation spectral overlap), then sequential scanning will not help. In such cases it will be necessary to do spectral separation on your images, and that will require imaging controls singly stained with each fluor to provide a reference.