Efficient Confocal Imaging
Since time is money when using the BBIC microscopes, it is in your best interest to use your scheduled time as efficiently as possible, i.e., for imaging, rather than troubleshooting. Proper preparation of samples BEFORE you bring them to the core is essential for the getting the most use of your imaging time.
If you are preparing samples for use on the Leica SP8, you should use 1.5 coverslips (roughly 0.17 mm thick). 1.5H coverslips are even better, as they have less variation in thickness. The objectives are designed to work best with this specific thickness. For the Olympus FV3000 you should also use 1.5 coverslips and if you are live imaging cells you should use dishes with a 1.5 glass bottom. The UCPLFLN20X objective can take images through plastic vessels, provided that the plastic is not thicker than 1 mm. WillCo Wells glass bottomed dishes work nicely on our FV3000 set up. MatTek Glass bottom culture plates (6 well) will work for live imaging larger subjects such as fish or frog embryos. Griener glass bottom plates are also an option for the Olympus, and their specifications are already programmed into the software. Glass-bottomed imaging chamber slides (available from Ibidi), can also be used to do short term time-lapse work on live cells with the FV3000. Not all Ibidi products are optimal, however.
Other thicknesses of coverslips will work with most of the air objectives, and any oil objectives with correction collars (provided the coverslip thickness is within range) but you will not be able to get a focus under oil with most of our high N/A objectives. There is nothing we can do to correct that, because that is how the microscope lightpaths are engineered. The FV3000 has 2 Si-oil objectives with correction collars, but none of the SP8 objectives are adjustable for different coverslip thicknesses. You are advised to save yourself a lot of frustration by being sure of the types of coverslips/vessels you are using. When in doubt, ask the Core Manager or the company sales reps!
Which Confocal Microscope should you use?
(a quick guide)
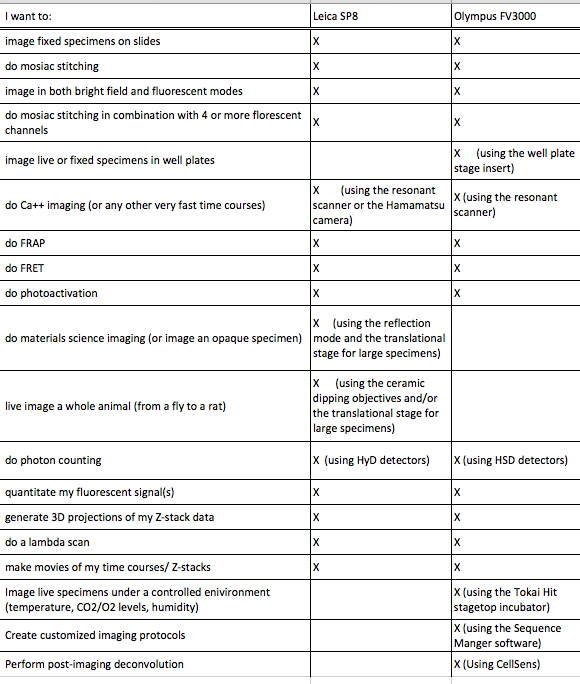
If your type of experiment is not listed here, contact us and we’ll discuss it.
Preparing Fixed Material
You should optimize your fixation conditions and 1°/2° antibody concentrations BEFORE you schedule a confocal imaging session. Look at your slides under epifluorescence first whenever possible to ensure they are properly stained. Ideally you should also do a negative control with 2° antibody only (for each 2° used) to help correct for any background. If your experiment uses multiple fluorophores, control slides singly labeled with each fluorophore are useful for correcting any bleedthrough/crosstalk effects between fluorophores. Such controls are also necessary for doing live Spectral Unmixing on the FV3000. Auto-fluorescence (both natural and fixative induced) can also interfere with imaging, which is another reason negative controls can be very useful.
Experimental Design
When planning your experiments, give careful consideration to your choices of fluorophores. The better fluorophores (such as the AlexaFluors) are more expensive, but are designed to be brighter, more resistant to photobleaching, and have fewer tendencies to self-quench. When imaging specimens stained with multiple fluorophores, you should select fluorophores with no or minimal spectral overlap whenever possible.
Fluorophore life can also be extended by storing your slides in a cold, dark place. Slides with quality fluorophores kept at 4°C can be usable for months after they are prepared.
If you are using a non-conventional holder/ platform for your specimens (not a slide or a dish or a well-plate) you should schedule a consultation with the Core manager. You need to consider: how will the specimen holder fit in the microscope stage inserts? Does the holder block the movement of objectives? Will the specimens be within the working distance of the objectives you wish to use? It may be necessary to design an adaptor to fit your holder into the microscope set up. Fortunately the MyNSM store offers 3D printing services.
Efficient Imaging
Know what’s on your specimens.. If you have prepared them yourself, it should be obvious (although it’s always a good idea to label your slides/containers with the fluors used, especially if they have different combinations of markers), but if you are imaging specimens prepared by someone else, you need to be clear on exactly what stains each one has, as that dictates the choice of lasers used. Also, DAPI counts.
Remember that an excess of oversaturated pixels is BAD. If you are doing a quantitation experiment, where you want to keep the same settings for scan speed/ detector voltage/ laser power for all specimens, you will need to make those settings based on the strongest signal for each relevant fluorescent marker.
Knowing the potential imaging problems you may face in your particular experiment and which imaging techniques to use will save you much time and anguish. It is far better to put in the extra time to prepare the appropriate controls and learn the various imaging techniques than it is to have to come back and re-image the samples. Or prepare new samples. Or reach the wrong conclusion due to faulty imaging technique. For example, if you know your fluorophores are susceptible to photo-bleaching, you can compensate by picking the least-damaging scanning times/patterns. When spectral overlap cannot be avoided, you can eliminate/minimize the effects through actions such as adjustment of the emission wavelength detection windows and by doing sequential scanning. It is much easier in the long run to put in the extra effort to get a good quality image from your scans than it is to try correcting a marginal quality image via post-imaging processing (be aware that many journals have restrictions on allowable post-imaging processing). Ask the Core manager for assistance with imaging techniques. We also have links to useful online imaging information under our “Links” tab.
Save your files frequently. Pay attention to which destination folders you send them to. Give them names that will help you to identify/find them (the date of the imaging session is a very useful thing to include in file names, for example). The software for both the Leica and Olympus systems will save the meta-data (information about imaging conditions), but keeping written notes about the details of each imaging session is recommended. There is no such thing as having too many images; electronic storage is plentiful and cheap. Likewise it is better to take a few extra Z-slices or time points, and edit your stacks later, than to take too few and find it necessary to re-image your samples.
A final note- our confocals can produce some amazing and beautiful images, but they do NOT perform miracles. If you use them on poor quality specimens, you will not get high quality pictures.
